At the end of each level, you are awarded a number of experience points, based on the number of enemy units you killed, and modified by your game modes and the Experience skill. As you gain experience, you will also gain levels – up to a maximum of Level 50.
Each time you gain a level, you will earn Skill Points (SP). SP can be divided among the available skills in any way you choose, and you can “respec” at any time – choosing one skill does not lock you into it. You begin with 10 SP, gain another 10 SP at Level 2, and gain an additional 5 SP every level thereafter.
Each skill has 7 ranks – your current rank in a skill is indicated by the colored bars on either side of the skill’s icon – the higher your rank, the higher the colored bar. The more ranks you put into a skill, the greater the benefit you’ll get out of it. Rising to a new rank in a skill requires both that you expend a certain number of SP and that you first reach a certain level.
Defense
| Rank |
Total SP Cost |
Level Required |
Total Effect |
|
1
|
5
|
2
|
Defense +20%
|
|
2
|
9
|
4
|
Defense +40%
|
|
3
|
12
|
8
|
Defense +60%
|
|
4
|
15
|
10
|
Defense +80%
|
|
5
|
19
|
16
|
Defense +100%
|
|
6
|
24
|
19
|
Defense +120%
|
|
7
|
30
|
23
|
Defense +140%
|
As the name implies, Defense raises your defense. Defense is probably the single most useful skill in the game – nearly every conceivable strategy benefits from having a high defense. Defense is important for everyone, but is even more important when playing Sudden Death Mode.
Attack

| Rank |
Total SP Cost |
Level Required |
Total Effect |
|
1
|
5
|
3
|
Attack +20%
|
|
2
|
9
|
5
|
Attack + 40%
|
|
3
|
12
|
9
|
Attack + 60%
|
|
4
|
15
|
11
|
Attack + 80%
|
|
5
|
19
|
15
|
Attack + 100%
|
|
6
|
24
|
17
|
Attack +120%
|
|
7
|
30
|
23
|
Attack +140%
|
Fairly self-explanatory, the Attack skill applies a percentage bonus to the Attack of all your units. The Attack skill is your main tool for expanding your army’s offensive capabilities, and therefore is critical in just about every situation. Attack is important for every army, but is most important for armies focused on blitzkrieg offensives or for No Magic Mode.
Speed

| Rank |
Total SP Cost |
Level Required |
Total Effect |
|
1
|
5
|
4
|
Speed +20%
|
|
2
|
9
|
8
|
Speed +40%
|
|
3
|
12
|
12
|
Speed +60%
|
|
4
|
15
|
16
|
Speed +80%
|
|
5
|
19
|
20
|
Speed +100%
|
|
6
|
24
|
25
|
Speed +120%
|
|
7
|
30
|
29
|
Speed +140%
|
More situational than the other statistic-boosting skills, Speed… increases the speed at which your units move. Seriously. This really should not need to be explained at this point. Speed is, like all the statistics-boosting skills, always at least somewhat useful, but it’s most useful on boss maps, or maps with strong towers, as it exposes the units to ranged attacks for a briefer period of time.
Agility

| Rank |
Total SP Cost |
Level Required |
Total Effect |
|
1
|
5
|
5
|
Agility +20%
|
|
2
|
9
|
8
|
Agility +40%
|
|
3
|
12
|
11
|
Agility +60%
|
|
4
|
15
|
15
|
Agility +80%
|
|
5
|
19
|
18
|
Agility +100%
|
|
6
|
24
|
23
|
Agility +120%
|
|
7
|
30
|
28
|
Agility +140%
|
“Agility?” Seriously? That’s the best name they could come up with for “population growth?”
Obvious jokes aside, Agility is a must have skill. Without agility, it simply becomes impossible to compete late game. Max this out even if you take no other army-oriented skills.
Crystals Init

| Rank |
Total SP Cost |
Level Required |
Total Effect |
|
1
|
5
|
0
|
Initial Crystals +25%
|
|
2
|
9
|
2
|
Initial Crystals +50%
|
|
3
|
12
|
7
|
Initial Crystals +75%
|
|
4
|
15
|
12
|
Initial Crystals +100%
|
|
5
|
19
|
17
|
Initial Crystals +125%
|
|
6
|
24
|
22
|
Initial Crystals +150%
|
|
7
|
30
|
27
|
Initial Crystals +200%
|
Crystals Init has the distinction of being first skill we encounter – in the course of the meandering order of the skills within this walkthrough, dictated by a secret logic known only to myself – that is completely useless. No matter how many ranks you put into this skill, your initial crystals will never be enough for more than a fireball. It’s simply not worth the investment for such a small, one time bonus.
The only circumstances under which I can advise you take ranks in this skill is if you’re trying to earn the “use spells only” rune. In that case, it’s critical. Otherwise, skip it.
Crystals Amount

| Rank |
Total SP Cost |
Level Required |
Total Effect |
|
1
|
5
|
0
|
Maximum Crystals +20%
Crystal Growth +20%
|
|
2
|
9
|
3
|
Maximum Crystals +40%
Crystal Growth +40%
|
|
3
|
12
|
7
|
Maximum Crystals +60%
Crystal Growth +60%
|
|
4
|
15
|
11
|
Maximum Crystals +80%
Crystal Growth +80%
|
|
5
|
19
|
15
|
Maximum Crystals +100%
Crystal Growth +100%
|
|
6
|
24
|
21
|
Maximum Crystals +120%
Crystal Growth +120%
|
|
7
|
30
|
27
|
Maximum Crystals +140%
Crystal Growth +140%
|
This skill is the one you want if you want more crystals. It raises your cap, but far more importantly it raises the speed at which you generate crystals. This skill is essentially mandatory if you want to focus on magic – otherwise, it’s merely good.
Experience

| Rank |
Total SP Cost |
Level Required |
Total Effect |
|
1
|
5
|
0
|
Experience Gain +15%
|
|
2
|
9
|
1
|
Experience Gain +30%
|
|
3
|
12
|
2
|
Experience Gain +45%
|
|
4
|
15
|
3
|
Experience Gain +60%
|
|
5
|
19
|
3
|
Experience Gain +75%
|
|
6
|
24
|
5
|
Experience Gain +90%
|
|
7
|
30
|
7
|
Experience Gain +105%
|
Experience is a skill you should take early, primarily so that you can gain more levels swiftly. You should generally have experienced maxed out for your current level if you can afford it, but if you run into trouble don’t be afraid to discard it for more powerful skills. You should always have experienced maxed out when grinding.
Spell Reload

| Rank |
Total SP Cost |
Level Required |
Total Effect |
|
1
|
5
|
0
|
Spell Cooldown -5%
|
|
2
|
9
|
2
|
Spell Cooldown -10%
|
|
3
|
12
|
5
|
Spell Cooldown -15%
|
|
4
|
15
|
8
|
Spell Cooldown -20%
|
|
5
|
19
|
12
|
Spell Cooldown -25%
|
|
6
|
24
|
16
|
Spell Cooldown -30%
|
|
7
|
30
|
21
|
Spell Cooldown -35%
|
Another must-have skill if you intend to use magic heavily. This allows you to cast spells much more frequently. It’s especially useful against bosses and absolutely vital if trying to earn the Spells Only rune.
Fireball

| Rank |
Total SP Cost |
Level Required |
Total Effect |
|
1
|
5
|
0
|
12 Damage
|
|
2
|
9
|
1
|
14 Damage
|
|
3
|
12
|
2
|
16 Damage
|
|
4
|
15
|
5
|
18 Damage
|
|
5
|
19
|
8
|
20 Damage
|
|
6
|
24
|
12
|
22 Damage
|
|
7
|
30
|
17
|
24 Damage
|
 Cost:
Cost: 230 Crystals

Fireball is the first spell you get, and it’s a solid one. As you may have guessed, it drops a ball of fire on the target area, damaging it. Fireball is your most basic attack spell, with a low cost and reload time, and it’s a good prelude to an offensive. It will be your go-to spell for much of the game, and while it becomes more situational in the late game, it will never be entirely useless.
The main problem with fireball is its area-of-effect – the best time to drop a fireball on an enemy building is just before your soldiers arrive, so that it has less time to regenerate, unfortunately, because of the 3 second delay as the fireball travels to its target, this makes it very easy to accidentally blow up your own troops. With fireballs, timing is key.
Fireballs have one key advantage, even over later spells – they bypass enemy Defense. A fireball will always do its listed damage. Therefore, even in the late game, they are always your most cost-effective option against towers.
Lightning

| Rank |
Total SP Cost |
Level Required |
Total Effect |
|
1
|
5
|
1
|
2 Damage/Second
14 Seconds
|
|
2
|
9
|
4
|
2.2 Damage/Second
16 Seconds
|
|
3
|
12
|
7
|
2.4 Damage/Second
18 Seconds
|
|
4
|
15
|
9
|
2.6 Damage/Second
20 Seconds
|
|
5
|
19
|
11
|
2.8 Damage/Second
22 Seconds
|
|
6
|
24
|
13
|
3 Damage/Second
24 Seconds
|
|
7
|
30
|
15
|
3.2 Damage/Second
26 Seconds
|
 Cost:
Cost: 520 Crystals

Another good, solid spell. Lightning is your basic damage over time spell, and as such it’s especially useful as a defensive measure – you can drop a Lightning spell over a likely enemy direction of attack and it should hold his advances at bay until the spell ends.
Apart from this, Lightning’s long duration makes it of limited use offensively – it simply takes too long to weaken an enemy building and then leave so that your forces can enter without the threat of friendly fire. Unlike a Fireball, Lightning is affected by enemy defense.
Meteorite

| Rank |
Total SP Cost |
Level Required |
Total Effect |
|
1
|
5
|
3
|
15 Damage
|
|
2
|
9
|
5
|
24 Damage
|
|
3
|
12
|
7
|
36 Damage
|
|
4
|
15
|
9
|
45 Damage
|
|
5
|
19
|
12
|
54 Damage
|
|
6
|
24
|
14
|
72 Damage
|
|
7
|
30
|
19
|
81 Damage
|
 Cost:
Cost: 640 Crystals

Meteorite is, essentially, a more powerful Fireball – it has a larger area of effect and does more damage. Fireballs will be more useful than Meteorite, at least at first – the lower casting cost and faster cooldown on Fireball typically means that you’ll be able to do more damage in a shorter span of time. Meteorite only becomes a means of dealing damage faster at Rank 3, and only finally becomes more cost-efficient at Rank 6.
In the late game, as it becomes more efficient, Meteorite will replace Fireball as your go-to spell, but it won’t be universal - unlike Fireball, Meteorite is affected by enemy defense, and its wide area-of-effect allows you to hit more enemy buildings at once, but also runs the risk of damaging your own forces. Nevertheless, once it becomes more efficient, Meteorite should be your standard choice for harassing the enemy.
Twister

| Rank |
Total SP Cost |
Level Required |
Total Effect |
|
1
|
5
|
2
|
1 Damage/Second
35 Seconds
|
|
2
|
9
|
5
|
1.15 Damage/Second
40 Seconds
|
|
3
|
12
|
7
|
1.3 Damage/Second
45 Seconds
|
|
4
|
15
|
10
|
1.45 Damage/Second
50 Seconds
|
|
5
|
19
|
14
|
1.6 Damage/Second
56 Seconds
|
|
6
|
24
|
19
|
1.75 Damage/Second
61 Seconds
|
|
7
|
30
|
25
|
1.9 Damage/Second
66 Seconds
|
 Cost:
Cost: 530 Crystals
Twister is a slower Lightning with more power and a wider area of effect. Only slightly more expensive than Lightning, Twister causes a tornado to appear and circle around the edges of the spell’s area of effect, damaging everything it comes into contact with. It’s not much more expensive than Lightning, either – it’s an alternative, not a full replacement.
Twister is somewhat clunky – anything the tornado is not in contact with won’t be harmed, so it’s a bad choice if you’re trying to defend a route. It is better than Lightning as an offensive tool, and for hitting multiple buildings at once. Unfortunately, its low damage per second means its ineffective against high-Agility enemies, who can simply regrow population faster than you can kill it.
Support

| Rank |
Total SP Cost |
Level Required |
Total Effect |
|
1
|
5
|
5
|
30 Infantry
|
|
2
|
9
|
8
|
60 Infantry
|
|
3
|
12
|
11
|
90 Infantry
|
|
4
|
15
|
15
|
120 Infantry
|
|
5
|
19
|
17
|
150 Infantry
|
|
6
|
24
|
22
|
180 Infantry
|
|
7
|
30
|
28
|
210 Infantry
|
 Cost:
Cost: 450 Crystals

Support is probably the most situational spell in the game. It creates a number of infantry at the edge of the map, near where you began, and has them march to the location you cast the spell on.
Support is useful in that it’s relatively cheap and gets you a bunch of infantry all at once – which means that, unlike most other spells, it’s affected by your Attack. It is
not useful in a manner conveniently screenshotted here for your review – the reinforcements have a tendency to wander through fields of Towers that tear them to pieces. It’s also not terribly useful for attacking, say, a boss, whose defenses are practically made to destroy infantry. It’s also not like you couldn’t just cast Golem instead.
Nevertheless, at the highest levels, Support can summon an enormous invasion force relatively quickly. Just be sure you’re know where they’re coming from.
Hypnosis

| Rank |
Total SP Cost |
Level Required |
Total Effect |
|
1
|
5
|
4
|
Area of Effect +15%
|
|
2
|
9
|
8
|
Area of Effect +30%
|
|
3
|
12
|
12
|
Area of Effect +45%
|
|
4
|
15
|
16
|
Area of Effect +60%
|
|
5
|
19
|
20
|
Area of Effect +75%
|
|
6
|
24
|
25
|
Area of Effect +90%
|
|
7
|
30
|
29
|
Area of Effect +105%
|
 Cost:
Cost: 550 Crystals

Hypnosis converts enemy units within the area of effect into your units. This sounds really powerful!
It’s not!
Hypnosis is, effectively, a purely defensive spell – it has no effect on buildings, and its maximum area of effect is about the size of a Fireball, which
can be used against buildings. So Hypnosis is only useful if you have the dexterity to grab a large patrol of enemy units.
Even then, it’s mostly just an annoyance rather than a severe threat. About the only time Hypnosis will be useful is if your enemy is moving in to take a neutral building and you Hypnotize his units en route – and the spell is so expensive that this will this be pretty darn rare. Even then, all it will get you is an isolated building in the middle of enemy territory.
Swamp

| Rank |
Total SP Cost |
Level Required |
Total Effect |
|
1
|
5
|
5
|
+20% Damage
+40% Duration
-5% Enemy Speed
|
|
2
|
9
|
8
|
+40% Damage
+80% Duration
-10% Enemy Speed
|
|
3
|
12
|
11
|
+60% Damage
+120% Duration
-15% Enemy Speed
|
|
4
|
15
|
14
|
+80% Damage
+160% Duration
-20% Enemy Speed
|
|
5
|
19
|
19
|
+100% Damage
+200% Duration
-25% Enemy Speed
|
|
6
|
24
|
25
|
+120% Damage
+240% Duration
-30% Enemy Speed
|
|
7
|
30
|
31
|
+140% Damage
+280% Duration
-35% Enemy Speed
|
 Cost:
Cost: 670 Crystals

You may have noticed an absence of my usual painstakingly researched hard numbers in the above table. You are welcome to take an hour or two to do my research for me.
Those of you who actually
did that, in sympathy I am allowing you an opportunity to cry out in frustration. Swamp is the most inconsistent spell in the game. Sometimes it’ll do seven damage. Sometimes it’ll do eight. It’s always weak and ineffectual, and never predictable.
The one thing Swamp
can do consistently is slow things down and kill enemy units. This means that, while its unreliability makes it terrible offensively, it’s a powerful defensive spell. Drop a swamp in front of an enemy attack and it will practically evaporate.
Golem

| Rank |
Total SP Cost |
Level Required |
Total Effect |
|
1
|
5
|
5
|
2 Damage
88 Life
+5% Speed
|
|
2
|
9
|
9
|
2.5 Damage
96 Life
+5% Speed
|
|
3
|
12
|
12
|
2.5 Damage
88
104 Life
+5% Speed
|
|
4
|
15
|
15
|
3 Damage
112 Life
+5% Speed
|
|
5
|
19
|
19
|
3.5 Damage
120 Life
+5% Speed
|
|
6
|
24
|
24
|
3.5 Damage
128 Life
+5% Speed
|
|
7
|
30
|
29
|
4 Damage
136 Life
+5% Speed
|
 Cost:
Cost: 750 Crystals


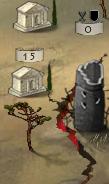
Golem is easily one of the most powerful spells in the game. Casting it does exactly what it says on the tin – it summons a golem at the designated location, who will attack nearby enemy units and buildings.
The golem moves and attacks rather slowly, but it has a significant amount of health, and will not die until that health is depleted. Because of this, golems are a very versatile damage over time spell, being able to wander the enemy’s territory and harass their buildings. They can also technically harass their units, but golems are so slow in comparison to enemy infantry that using them defensively is more a bonus than an actual strategy.
Offensively, however, golems are quite useful. When dropped behind enemy lines, provided there is no tower nearby, they are capable of doing immense damage.
Earthquake

| Rank |
Total SP Cost |
Level Required |
Total Effect |
|
1
|
5
|
9
|
+5% Damage/Second
+15% Duration
|
|
2
|
9
|
13
|
+10% Damage/Second
+30% Duration
|
|
3
|
12
|
17
|
+15% Damage/Second
+45% Duration
|
|
4
|
15
|
21
|
+20% Damage/Second
+60% Duration
|
|
5
|
19
|
26
|
+25% Damage/Second
+75% Duration
|
|
6
|
24
|
31
|
+30% Damage/Second
+90% Duration
|
|
7
|
30
|
37
|
+35% Damage/Second
+105% Duration
|
 Cost:
Cost: 1250
At this point, you may be looking at the effects column and saying, “Okay, seriously, walkthrough guy? This is the best you can do? Are you under intense time pressure or something?”
And while you would have a very good point, there’s really not much point in quantifying the relative affects of different levels of earthquake, anyway. Honestly, you shouldn’t be spending too make skill points on this skill anyway.
Not because Earthquake is a bad spell, by the way.
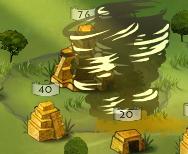
Because it’s
too good.
While kind of expensive in crystals, even a Rank One Earthquake will completely destroy almost any building you cast it on. See that tower in the screenshot above? That tower was full. That’s a Rank One Earthquake. There’s not really much point in spending more Skill Points in a crazed attempt to reduce buildings to
negative population.
While powerful, Earthquake is also very expensive. It’s best employed against bosses or
really nasty hardpoints, such as a fully stacked Large Tower.
Shield

| Rank |
Total SP Cost |
Level Required |
Total Effect |
|
1
|
5
|
0
|
+10% Hit Points
|
|
2
|
9
|
1
|
+20% Hit Points
|
|
3
|
12
|
2
|
+30% Hit Points
|
|
4
|
15
|
5
|
+40% Hit Points
|
|
5
|
19
|
7
|
+50% Hit Points
|
|
6
|
24
|
9
|
+60% Hit Points
|
|
7
|
30
|
11
|
+70% Hit Points
|
 Cost:
Cost: 170 Crystals
This spell provides some protection for one building against enemy spells.
So yeah, don’t bother